Showing posts with label to. Show all posts
Showing posts with label to. Show all posts
Wednesday, March 8, 2017
Communicating Linux Chroot to Android
Communicating Linux Chroot to Android
The technique of installing a full Linux distro on your Android phone has been around for a long time. I’ve used it in the past, but for a while didn’t have a phone with a physical keyboard, which made it less useful. Now that I have CM7.1 on my G2 I’ve installed it again. I’m actually using an updated prepackaged version of Ubuntu, which has been fantastic.
However, generally speaking you can run the command line stuff and have it manipulate stuff on the filesystem, but the stuff you run “in Linux” don’t interact with Android. Poking around the other day I noticed that SL4A, the Android scripting system has a “server mode”. Normally the scripts run by SL4A communicate with a generic RPC service which hooks the interpreters back into the Android system. There’s also a mode to just startup the RPC service and bind it to the loopback port or a public interface. And it talks JSON!
So, theoretically, I should be able to startup a SL4A server, run scripts in the Linux environment, and they can send messages to the outside Android system. I needed to test it out of course. If you have SL4A installed you select View from the top level menu, then Interpreters, and then “Start Server” from the menu there, and select “Private” from the context menu that pops up. There should now be a SL4A entry in the dropdown notification area, if you tap on that you can see the running server and it’ll tell you the port. Or, you could just get it from the command line, since thats where we’re going next.
Login via ADB or terminal, or however you prefer. Swap over to Linux, or mount up the unionfs stuff if you’re doing it Saurik’s way. And then you can use anything that can connect to a TCP socket and emit some JSON to send messages. I used netcat for the simplest example:
echo ‘{“id”:1,”method”:”makeToast”,”params”:["The Great HooDoo ..."]}’ | nc 127.0.0.1 38804
And tada! The message shows up on my device:

Really hacky thing to do right now, but it’s interesting in that it would potentially let that stuff running as Linux commands to interact with the rest of the system. Even just being able to deliver local notifications so that you know to check back on something running in terminal to see updates is pretty cool.
Available link for download
Wednesday, March 1, 2017
CM12 How to remove Google Search Bar
CM12 How to remove Google Search Bar
How to remove Google Search Bar on the Launcher?
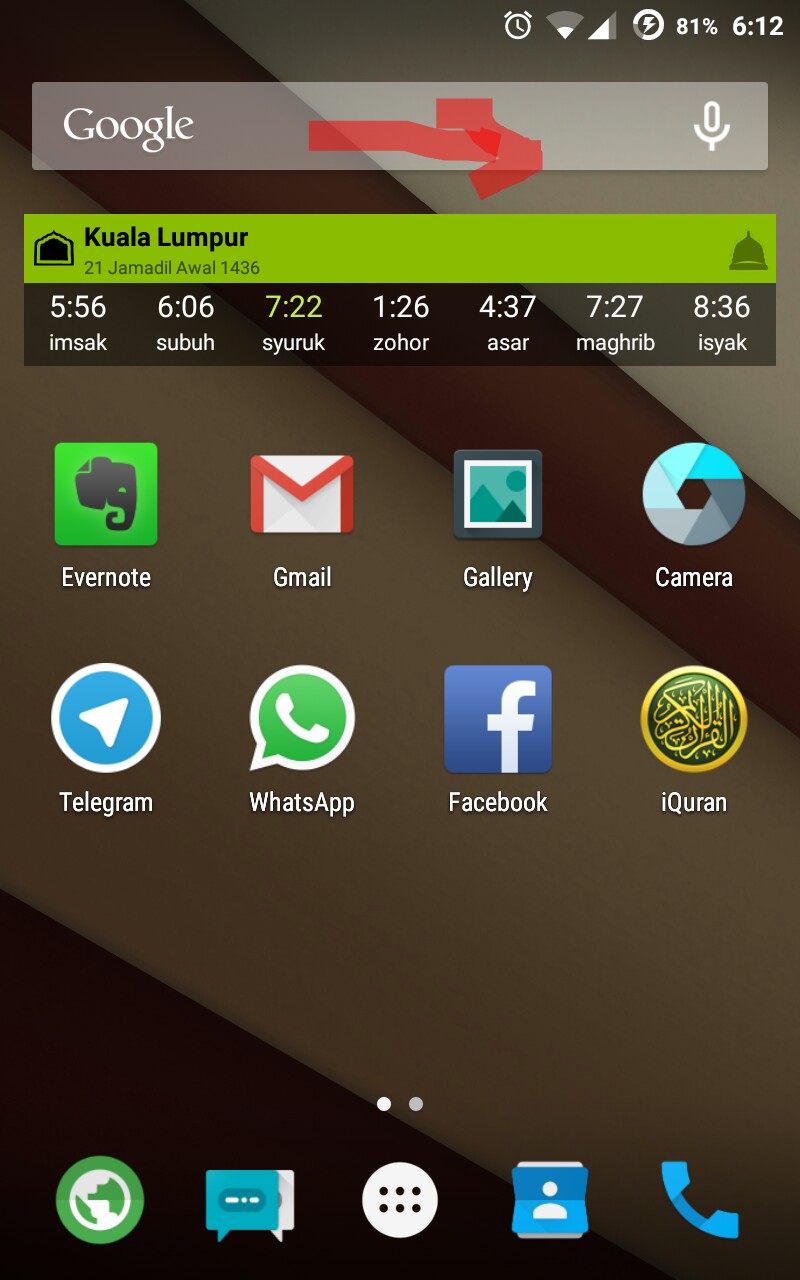
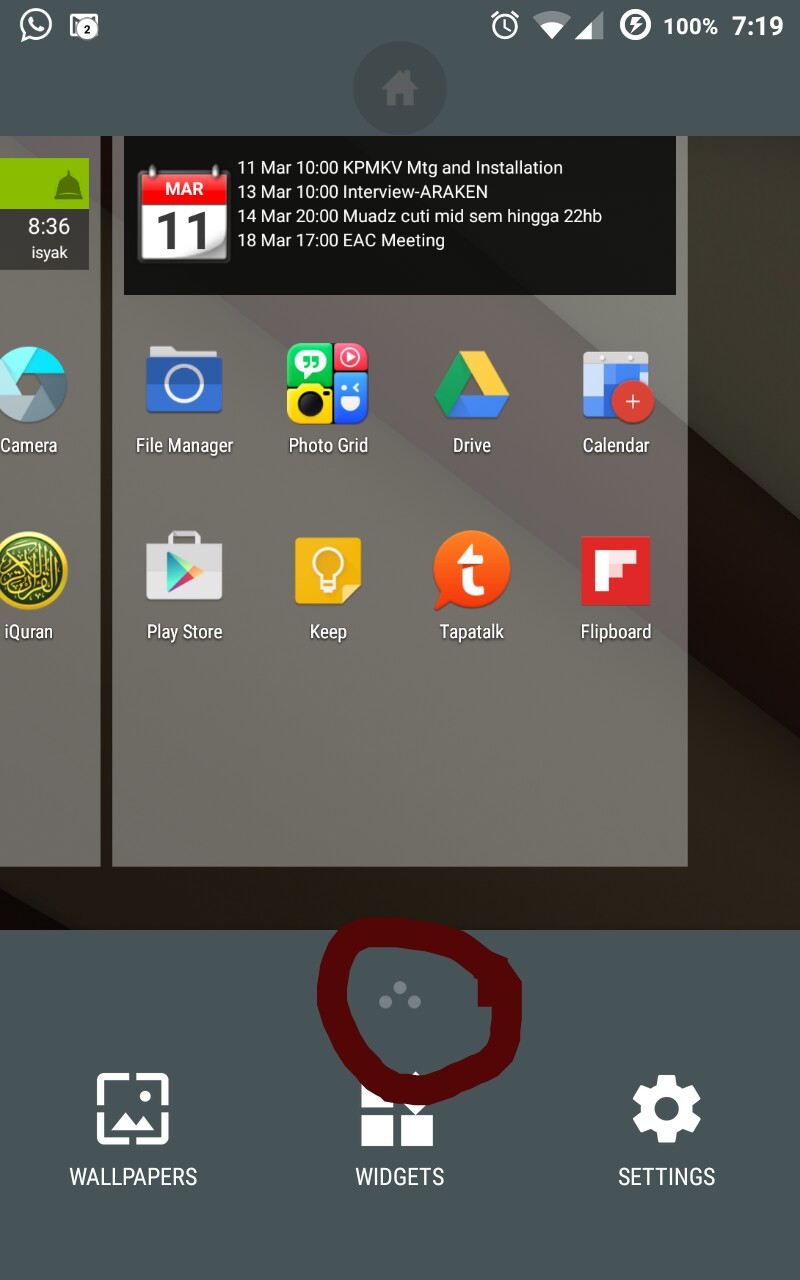
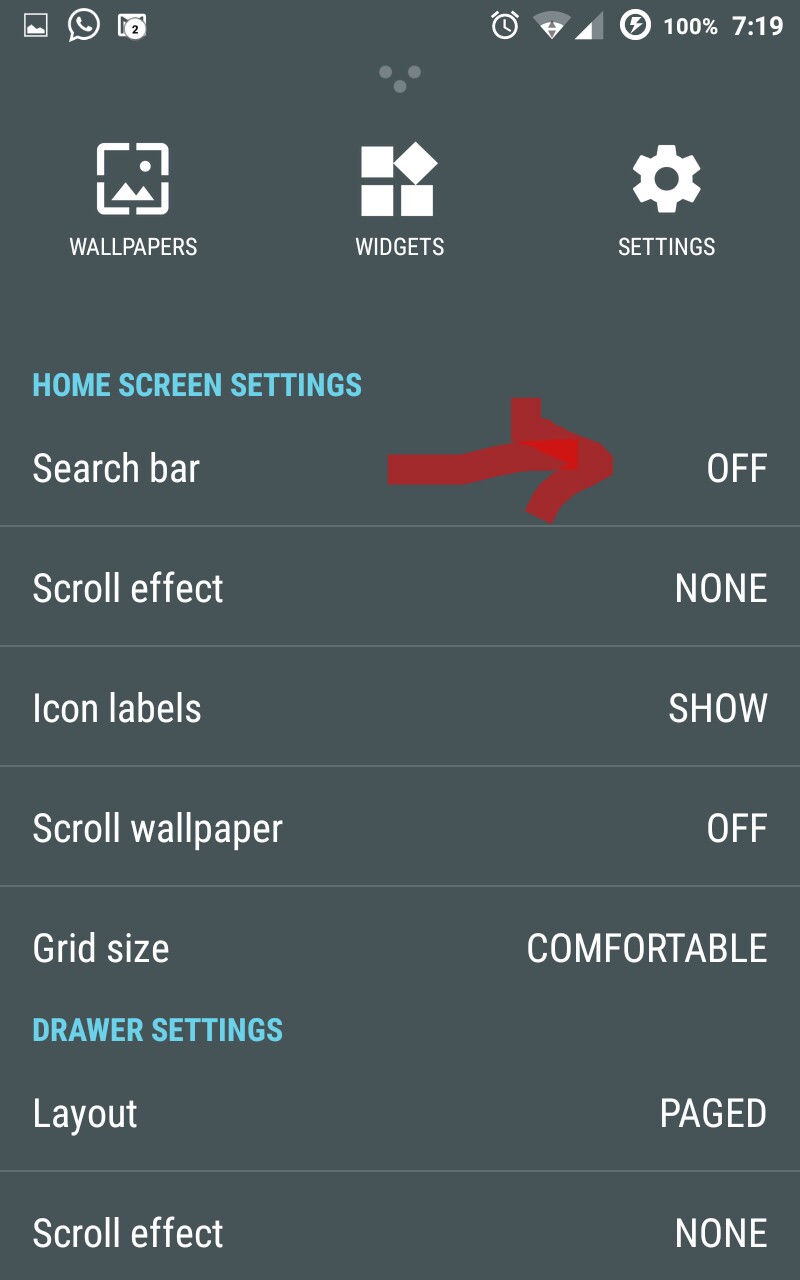
Happy setting your launcher.
Available link for download
Saturday, February 25, 2017
cara menggunakan navicorp win to flash
cara menggunakan navicorp win to flash

untuk langkah2 pembuatan USB bootable sebagai berikut:
1. Pertama2 sobat harus mempunyai dulu installer Windows, entah itu dalam bentuk CD/ DVD, file ISO,atau folder yang berisi installer OS Windows.
2. Siapkan flashdisk dengan ukuran yang sesuai dengan file installer windowsnya.
3. aplikasi ini bersifat portable, jadi sobat bisa menjalankannya melalui PC lain, misal punya temen, warnet, dan lain-lain.
4. Jika sobat punya CD OS Windows, sobat bisa menyiapkan bootable USB flashdisk lewat komputer lain yang ada CD/ DVD romnya. Jika sobat punya installer Windows dalam bentuk file ISO, buka dulu file ISO tersebut menggunakan aplikasi virtual drive, misalnya Daemon Tool Lite atau bisa juga dibuka dengan Winrar dengan mengekstraknya ke dalam satu folder
5. Download WinToFlash
6. Jalankan WinToFlash.ex, kmdian sobat akan menjumpai intruksi lisenci managemen, sobat klik saja
accept,
7. Pilih tab "advance mode" untuk memilih OS apa yang akan sobat gunakan untuk menginstall, kemudian klik run.

8. Tentukan Windows Source path dengan mengklik select dan tentukan lokasi installer Windows anda, dan pada "USB drive" klik select untuk menentukan lokasi flashdisk anda,

9. untuk tab yang lain biarkan saja utuh secara default.
10. Klik run, maka akan muncul license agreement, pilih accept dan continue, maka proses pengcopiyan windows ke flashdisk akan berjalan,
11. Jika proses selesai klik finish dan exit setup
12. Kini flashdisk sobat sudah bisa digunakan untuk melakukan instalasi Windows
13. sebelum menggunakan flasdisk untu menginstal, sobat atur dlu biosnya, agar USB Hard Drive menjadi pilhan pertama booting. misalnya untuk laptop acer tekan F2 saat pertama kali menyalakan laptop, kmdian sobat akan masuk pada bios, dan klik menu "boot" dan jadikan USB Hard Drive berada pada posisi yang paling atas. kemudian exit dan save change.
14. tancapkan flasdisk sobat yang sudah berisi windows installer tadi, maka ketika sobat nyalakan PC sobat, secara otomatis akan masuk ke dalam mode instalasi windows... kemudian lakukan proses instal.
15. setelah proses instalasi berjalan, setengah perjalanan, windows sobat akan secara otomatis merestart PC kawan,
Available link for download
Wednesday, February 1, 2017
Change Default STatus Bar to S3 Statusbar icons
Change Default STatus Bar to S3 Statusbar icons
S3 Status bar
Hai,
Today im gonna show you new s3 statusbar icons for our ace.. It is ported from SGS3.. !!

Link in attachments
How to:
1. Extract zip file.
2. Check similar icons.
3. Copy and replace with your icons.
Thanks
Hai,
Today im gonna show you new s3 statusbar icons for our ace.. It is ported from SGS3.. !!
Link in attachments
How to:
1. Extract zip file.
2. Check similar icons.
3. Copy and replace with your icons.
Thanks
Available link for download
Saturday, January 14, 2017
Coming to terms with Gnome 3
Coming to terms with Gnome 3
While many Ubuntu users are jumping like rats from a sinking ship in droves to other greener, Mintier pastures, I for one am not a fan of change for the sake of change, whether it be in the DE (desktop environment) or which distro Im using currently. Ive been an Ubuntu user since 2007 and was perfectly happy to stick with Ubuntu until the catastrophe that is Unity was unleashed upon the unwitting Open Source masses. No thank you, Ill stick with my Gnome desktop. Oh wait, the rest of the Linux world has switched to Gnome Shell! Gnome shell and Unity are horrible implementations of a desktop environment, and they suffer from the same mistakes that both Windows 8 and OSX 10.7 "Lion" do -- trying to implement a touch centric interface that lends itself well to mobile devices like smart phones and tablets to the desktop. Creating a unified computing environment for the desktop, netbook, tablet and smart phone is certainly a novel concept but in practice it is a complete disaster. A desktop computer does not fulfill the same role that a tablet or a netbook does. For one thing, with the exception of a very select few, desktop computers lack one major feature that differentiates your computer monitor from a tablet, namely, a touch screen. The reason why the touch screen interface lends itself well to a phone or tablet is primarily because the screen can be laid down on a flat surface (like your lap). A computer monitor is a vertical surface, a design aesthetic that will not be changing any time soon, and having a vertical touch screen just doesnt work. Once again, another novel concept but in practice its a disaster.
For some unknown reason, the Gnome developers along with the Unity developers have not taken any cues from the rest of the computer world and failed to include a viable traditional interface. Windows does not require you to use Metro, Launchpad can be thoroughly ignored in OSX Lion and even KDE still includes a fully functional traditional desktop. The Gnome camp has put all their eggs in the Shell/Unity basket leaving only the "Gnome Fallback Session" (AKA Gnome Classic), which is a stripped down stop gap effort to retain support for lesser hardware, where lightweight desktops like XFCE and LXDE would be far better suited. Massive gaping holes are left where Gnome 2.3 used to shine, leaving users to fend for themselves and install third party tools like "Gnome Tweak Tool" to hack some semblance of traditional functionality back into their desktop. By default there is not even a way to change GTK, Metacity, Cursor and Icon themes! To wit, the same criticism can be leveled at OSX and Windows but coming from the free world of software where such things have been customary for years (and are still supported on EVERY OTHER DESKTOP ENVIRONMENT) this development is a step backwards.
In short, Gnome 3 is a disappointment much in the same way that KDE4 was when it was first released. It is buggy and far from feature complete. But despite its many faults, it does have one saving grace and for that reason I continue to soldier through the disaster that has become of my once finely tuned desktop experience on Linux. I can still use my computer in a traditional manner. For Ubuntu 12.04 which is due to hit the www in just a few days, special attention has finally been paid to the Fallback session likely in anticipation of the users who have been using 10.04 LTS blissfully unaware of the catastrophe that has befallen their beloved Gnome desktop. There are still quite a few things that are not intuitive when transitioning from Gnome 2.3 to Gnome Classic, notably the need to press alt+left click to rearrange panel applets (they really should have made a sign or something). But after a few hours of tinkering, its possible to get back to a desktop experience that makes sense once again without having to use any silly add ons or patches that are certainly not well supported, nor will they ever find their way back up stream. While I commend the Linux Mint developers for their fine work and attempts to bring functionality back to the Gnome desktop, I feel that their efforts are far too divided to be effectual. I mean, cmon! Gnome Shell, Mint Gnome Shell Extensions, MATE and AND Cinnamon?!?!?! Why so much schism? The Mint devs, and the devs from EVERY OTHER distro for that matter who are not keen on the changes to Gnome should put their efforts into improving the fallback session rather than creating further schism within the already fractured camp that once was the mighty Gnome desktop.
The fact of the matter is, MATE is an evolution brought about my necessity much like Trinity was when KDE4 was first introduced. I say was because although its still available for download, Trinity is largely unsupported and has already enjoyed its 15 minutes of fame. Its flash in the pan popularity has waned and and it will eventually disappear and become a footnote on a Wiki page somewhere. Eventually, porting Gnome3 to the Gnome2 environment will become impossible and MATE along with its ridiculous and unnecessary renaming of applications will unceremoniously be forced into retirement just like Trinity, with nothing to show for its existence except for a git repository that will most assuredly become a 404 in the process of time.
My suggestion is that there be a push for Gnome Classic as the default desktop and MAKE IT WORK DAMMIT! Call it Gnome and make it the default session, no need to downplay it by calling it a "fallback" or "classic" environment. Then just refer to Gnome Shell as "Shell". Make it optional and not the default. Do not force it down the throats of those who do not want to use it. And while were on the subject, maybe we can get the UN involved and place a formal injunction or something against Unity and have it banned once and for all.
Available link for download
Tuesday, December 27, 2016
Change to S4 styled Phone DialerTabActivity Mms My files Job Manager Contacts and Browser
Change to S4 styled Phone DialerTabActivity Mms My files Job Manager Contacts and Browser
Screenshots


Links in attachments
Push into system/app and set permission as
r-w
r
r
Reboot
NOTE: These apk are only for TouchWiz Resurrection rom. I dont know it will work on other roms. So try at your own risk..!!!!
Links in attachments
Push into system/app and set permission as
r-w
r
r
Reboot
NOTE: These apk are only for TouchWiz Resurrection rom. I dont know it will work on other roms. So try at your own risk..!!!!
Available link for download
Thursday, December 1, 2016
Cara Mudah Membuat Scrool To Top dengan JQuery
Cara Mudah Membuat Scrool To Top dengan JQuery
Cara Mudah dan Gampang Membuat Scrool To Top menggunakan J-Query - Triks mudah membuat Scrool To Top di Blogspot memakai J-Query. Keunggulan To Top Button ini adalah ketika halaman blog pada posisi diatas maka Button akan secara otomatis akan ter hidden namun ketika saat scrool berada di bawah maka tombol to Top ini akan muncul.
| to top dengan J-Query |
Cara Membuat Scrool To Top JQuery ini dapat Anda pergunakan di blog Anda dan tidak akan membuat blog Anda semakin rame justru akan nampak semakin bagus, disertai juga dengan J-Query sehingga ketika diklik tombol top nya akan secara halus halaman akan di scrool keatas.
Berikut ini langkah-langkahnya
1. Copy script berikut diatas code ]]></b:skin>
<!-- created by eftutor blogspot -->2. Copy Script Berikut di atas code </body>
#toTop {width:50px; height:50px; background: transparent;
border:1px solid #333; color:red; text-align:center;padding:5px;
position:fixed; bottom:50px; right:50px; cursor:pointer; text-decoration:none;
font-weight:bold;font-size: 14px; -moz-border-radius:5px; -khtml-border-radius:5px;
-webkit-border-radius:5px; border-radius:5px;opacity:0.3;
}
<a href=# id=toTop>? TOP</a>Untuk font yang berwarna merah bisa tidak Anda ikutkan atau anda hapus jika diblog Anda sudah ada.
<script src=http://ajax.googleapis.com/ajax/libs/jquery/1.7.1/jquery.min.js type=text/javascript/> <script type=text/javascript>
$(function(){$.fn.scrollToTop=function(){$(this).hide().removeAttr("href");if($(window).scrollTop()!="0"){$(this).fadeIn("slow")}var scrollDiv=$(this);$(window).scroll(function(){if($(window).scrollTop()=="0"){$(scrollDiv).fadeOut("slow")}else{$(scrollDiv).fadeIn("slow")}});$(this).click(function(){$("html, body").animate({scrollTop:0},"slow")})}});
$(function() {
$("#toTop").scrollToTop();
});
</script>
Sejauh ini anda sudah dapat save template Anda dan silahkan dilihat di pojok kiri bawah, jangan lupa untuk men scrool ke bawah blog Anda.
Jika Anda ingin mengganti ? TOP dengan gambar, silahkan ikuti tips berikut ini sob...
Anda dapat mengganti kode CSS diatas dengan script berikut ini :
<!-- http://eftutor.blogspot.com -->Selanjutnya silahkan Anda rubah <a href=# id=toTop>? TOP</a> dengan script berikut ini :
#toTop {width:50px; height:50px; background: transparent; padding:5px;
position:fixed; bottom:50px; right:50px; cursor:pointer; opacity:0.3;
}
<a href=# id=toTop><img src=LINK IMAGE/></a>Link image, anda dapat memakai link berikut ini :
https://blogger.googleusercontent.com/img/b/R29vZ2xl/AVvXsEhzyzLUFUXLOruzTLmACbBBZWZjowZRY_0HZxVrmh1CV9R5CTVCwWpCICiXYKqVaxwhpFtEnIsBzZfu_ktLyXVxUT6ehNT9xqWzcF1St2IOs6RU7qx8zANtc1SQ3EHsSFu6fBny0-vl6dE/s128/icon%20to%20top.png

Oke sampai disini dulu brow Tutorial saya tentang cara membuat Scrool To Top dengan J-Query di Blogspot, selamat mencoba dan jangan lupa tinggalkan jejakmu dikomentar, serta like nya jika artikel ini berguna bagi ente. Semoga Sukses.
Baca juga : Cara Membuat Tab pada Sidebar dengan JQuery
Available link for download
Subscribe to:
Posts (Atom)