Showing posts with label 6. Show all posts
Showing posts with label 6. Show all posts
Wednesday, March 29, 2017
Cara Mengatasi Memory Less Than 15 MB Counter Strike 1 6 and Condition Zero pada Windows 7
Cara Mengatasi Memory Less Than 15 MB Counter Strike 1 6 and Condition Zero pada Windows 7
1. Klik kanan di shortcut counter strike
2. Klik properties

3. Dan klik compatibilty tab

4. pilih "windows 7" on run mode,kalo OSnya make windows Xp pilih windows Xp.
5. Klik apply
6. dan klik OK

baca juga artikel ini.....
dan dapatkan modal pinjaman $10 dari Profitclicking dengan Klik disni
bagi yang ingin tanya-tanya seputar JSS-tripler add Yahoo Mesengger saya di arifzorro
Available link for download

Saturday, March 25, 2017
Cara Flash Android Google Nexus 5 6 7 9 Player
Cara Flash Android Google Nexus 5 6 7 9 Player
Cara Flash Android Google Nexus 5 6 7 9 10 Player - How to upgrade Google Nexus, Yups, Bagian dari kebanggaan untuk kamu yang mempunyai perangkat seperti Google Nexus, namun jika kamu mempunyai masalah dengan perangkatmu, mungkin karena kamu melakukan root, dan bermain main dengan system operasinya sehingga mengalami kelambatan atau kesalahan pada system, tetapi tenang saja, platform telah menyediakan ketersediaan reguler untuk mengembalikan ke kondisi pabrikan.
 |
| Upgarading Google Nexus |
Google sudah cukup baik selama bertahun-tahun telah membuat ketersediaan firmware yang tak lama setelah pembaruan terbaru versi Android dari OTA update.
Kami akan memberikan solusi dan jalan keluar agar perangkatmu normal kembali seperti semula, namun cara yang kami arahkan akan menghapus data data perangkat sampai bersih, Karena hal ini, betapa penting nya untuk mencadangkan data data sebelumya.
Sebelum melakukan flashing atau upgrade, langkah pertama adalah, teliti memilih firmware yang sesuai dengan perangkat nexusmu. Kamu dapat memastikan dengan melihat box kotak saat kamu membeli perangkat atau kamu bisa melihat model yang tertera dibalik baterai.
Cara ini tidaklah sulit meski memerlukan adb yang perlu diaktifkan pada PC dan beberapa perintah command prompt. Sesuai prosedur, ini akan berjalan pada semua perangkat nexus. Jadi, untuk kamu yang sudah yakin melakukan flashing atau upgrading simak arahan berikut:
Intruksi:
- Kamu harus mempunyai AndroidSDK di PC kamu, untuk yang terbaru silahkan download disini.
- Pastikan adb pada PC kamu sudah aktif, akan tetapi dengan hanya menginstal AndroidSDK, otomatis adb sudah langsung aktif. baca juga Cara Instal Fastboot dan ADB Driver.
- Silahkan download
Pada command prompt, ketikkan perintah berikut:
adb reboot bootloader
Tekan enter, seharusnya perangkat kamu sudah melakukan reboot otomatis dan masuk bootloader. Jika ya, silahkan ketikkan perintah selanjutnya:
fastboot oem unlock
Enter
flash-all atau fash-all.sh
Enter
Tunggu hingga proses selesai dan reboot otomatis. Jika kamu ingin mengembalikannya 100%, silahkan melakukan lock kembali dengan cara memasukan kembali USB ke perangkat dalam keadaan hidup, masuk ke folder flaform-tools dan open command seperti sebelumnya dan ketik perintah:
adb reboot bootloader
Enter
fastboot oem lock
Enter
adb reboot
Enter
Harusnya perangkat kamu reboot otomatis dan selamat perangkat kamu telah ter upgrade atau kembali ke pabrikan.
Jika kamu menggunakan Mac OS, pastikan mengetik semua perintah menggunakan ./ pada awal perintah, ( contoh: ./adb reboot bootloader )
Available link for download
Saturday, March 4, 2017
change imei Apple iphone 6
change imei Apple iphone 6

Iphone 6 copy mtk6572
Iphone 6 cloned change imei free
free change cloned iphone 6 imei
change imei iphone 6 clone
imei changer code for iphone 6 copy
you can change imei your iphone 6 cloned
free without any box or link
Mtk 6572 free iphone 6 imei change
edit your own imei iphone 6 mtk 6572

Please Wait few seconds
Available link for download
Wednesday, March 1, 2017
Cara Merubah Warna Mobil Dengan Memakai Adobe Photoshop CS 6
Cara Merubah Warna Mobil Dengan Memakai Adobe Photoshop CS 6

1.Adobe Photoshop CS6 (Bisa Versi apa aja)
2.Gambar mobil yang akan anda ubah warna bodynya
3.luangkan waktu untuk membaca artikel ini dan mempraktekannya
4.Baca Basmalah Dulu sebelum bekerja
5.ini yang terakhir yang paling penting ialah KONSENTRASI
>>Pertama<<
Buka Adobe Photoshopnya lalu kalau sudah ada tampilan layar kerja Adobe Photoshop maka selanjutnya kita menuju ke menu File kita akan pilih menu selanjutnya yaitu Opens dan setelah itu akan terbuka menu Windows Explore dan buka Pictures Library dan setelah itu pilih Gambar mobil yang akan anda Ubah warna catnya.
>>Kedua<<
setelah gambarnya sudah berada di menu editor kita pilih menu Hue/Saturation dan kita bisa atur warnanya dengan Hue dan untuk mecerahkan warnanya kita akan atur memakai Saturation.
>>Ketiga<<
Setelah ada perubahan pada warna cat mobil itu berarti proses merubah catnya sudah selesai.
>>Terakhir<<
Kita Save Gambar itu dan kita liat hasilnya.Baguskan.....!!!!
Yaaahh.....!!! tutorialnya sudah selesai selamat mencoba dan SEMOGA BERMANFAAT . Untuk anda yang masih belum mengerti silahkan tonton video dari Channel Youtube Milik saya oke Dibawah sini
Available link for download
Wednesday, January 25, 2017
Cara Copy CD Dengan Nero 6
Cara Copy CD Dengan Nero 6
Cara Copy CD Dengan Nero 6
Copy CD / DVD dengan Software Nero 6 Untuk suatu kepentingan kita harus bisa mengcopy suatu CD / DVD yang kita inginkan tanpa harus memilih lagi isi dari CD/DVD tersebut. Misalnya untuk keperluan instal komputer tentu saja kita harus memiliki CD /DVD Windows yang bisa digunakan untuk proses booting, karena dengan proses burning biasa, maka si CD/DVD tersebut tidak akan terbaca oleh komputer saat proses penginstalan, untuk itu jalan yang dapat dilakukan adalah dengan menggunakan cara Copy CD dari CD aslinya dengan menggunakan sebuah software. Software yang saya gunakan kali ini adalah software Nero 6, Seperti biasa, saya sediakan link untuk download Software ini bagi yang belum mempunyai Nero 6
Download Nero 6
Cara mengcopy CD /DVD dengan Nero 6
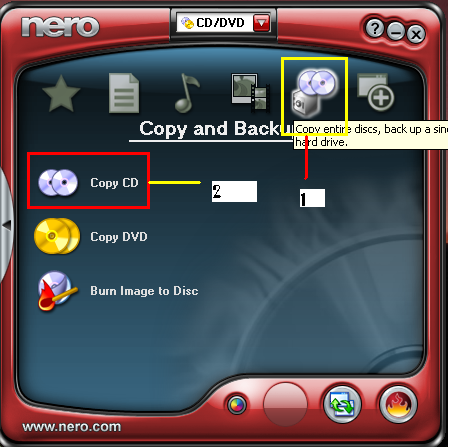
Silahkan buka program Nero 6 yang sudah di download dan terinstal di komputer anda, maka akan tampil seperti berikut ini langsung saja masukkan CD yang akan di kopi, klik bagian yang dilingkari lalu Copy CD
Writing Speed digunakan untuk menentukkan kecepatan burning , semakin kecil kecepatannya maka lebih lama proses burningnya, tetapi lebih bagus kualitas burningnya
Number of Copies digunakan untuk menentukkan berapa kopi an anda ingin menggandakan cd tersebut, setelah anda selesai , silahkan klik COPY

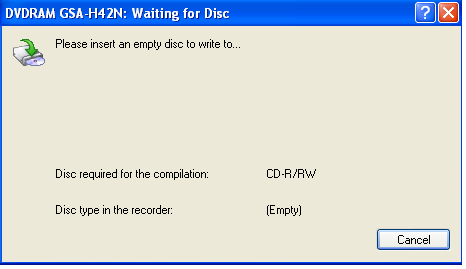
Proses burning pun berjalan, anda tinggal menunggu proses selesai, dan CD akan terbuka sendiri dan meminta anda memasukkan CD blank
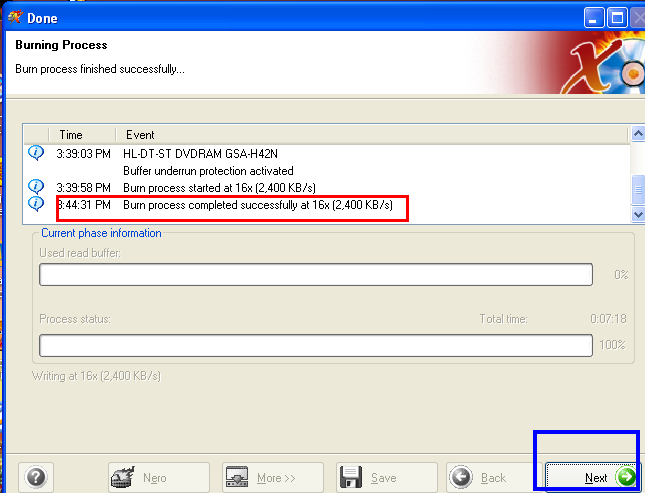
Proses burningpun selesai dan klik exit

referensi gambar : http://infoneroy.blogspot.com/2012/04/cara-copy-cd-menggunakan-nero.html

Cara Copy CD Dengan Nero 6
Available link for download
Friday, January 6, 2017
Cara install Xposed Installer di Android 6 0 Marshmallow dan 5 0 Lollipop
Cara install Xposed Installer di Android 6 0 Marshmallow dan 5 0 Lollipop
Cara install Xposed Installer di Android 6.0 Marshmallow dan 5.0 Lollipop - Sedang marak nya para Androiders dengan mengubah tampilan android kesayangannya menggunakan aplikasi modul yaitu Xposed, Sebagai user android yang awam sebagian besar kurang mengetahui apa sih itu modul, dan apa sih itu xposed, karena hal ini aplikasi xposed membutuhkan hak akses pada system alias kudu di root, selain di root membutuhkan install custom recovery atau cwm terlebih dahulu sesuai brand nya masing masing. Nah, bagi yang device nya belum di root, kita sarankan untuk rooting terlebih dahulu.
 |
| Xposed installer framework marshmallow |
Baik, disini kita tidak akan membahas cara Installnya untuk versi android kitkat atau pun jellybean ke bawah pada umumnya, melainkan untuk versi android 5.0 Lollipop dan 6.0 Marshmallow yang pada saat ini menjadi OS Android yang paling tercanggih dan teratas menggunakan Xposed versi 7.6 karena saat ini tersedia dengan dukungan Android 6.0 Marshmallow.
Pencipta Xposed dan XDA Rockstar rovo89 telah bekerja keras untuk membawa kemampuan menakjubkan pada Xposed untuk Marshmallow meskipun Android 6.0 memakan kapasitas upgrade yang sangat besar, rovo89 (pengembang) memberanikan diri dan sekarang memiliki framework terupdate yang mendukung sebagian besar dari apa yang akan kita perlukan.
Sayangnya ada beberapa keterbatasan, namun sebagai berikut:
- Banyaknya modul yang memerlukan pembaharuan
- Beberapa di antaranya dinyatakan akan bertentangan dengan modifikasi pada partisi sistem
- Sementara sistem boot tanpa ada masalah dari framework, beberapa fungsi mungkin masih perlu penyesuaian untuk Marshmallow
- Beberapa masalah mungkin timbul karena ini baru di Marshmallow, mungkin ada konsekuensi tak terduga dalam kombinasi dengan Xposed. Hal ini bisa mengakibatkan tidak bekerja dengan benar atau crash
Termasuk keterbatasan mereka, Xposed jika di install pada Marshmallow, berarti akan dapat membuka potensi pada device Kamu sekali lagi. Ingat bahwa banyak modul favorit Kamu mungkin perlu memperbarui seperti yang dikatakan di point 1, jadi pastikan untuk memeriksa secara relevan
Namun jangan berkecil hati, rovo89 berencana menerbitkan versi baru untuk 5.0 dan 5.1 dalam hari ke depan, dan beberapa perubahan dilakukan untuk 6.0 Marshmallow.
Silahkan install hanya jika Kamu bersedia untuk mengambil risiko loop booting atau bootloop istilah katanya "do with you own risk" seperti yang dikatakan pengembang pengembangnya. Oleh karena itu aplikasi ini akan bekerja dengan baik dan stabil namun ada beberapa keterbatasan tapi bagi kita tidak berarti, dan akan mendukung untuk semua versi 5.0 dan 6.0 dengan cara yang sama.
download:
- XposedInstaller_3.0-alpha.apk Harus diinstal untuk mengelola modul-modul yang terinstall
- XposedBridgeApi-20150213.jar API untuk pengembang modul, dalam kasus mereka ingin memanfaatkan beberapa fitur baru. Mungkin berubah sedikit sampai rilis stabil
- xposed-v*-sdk*-*.zip Harus di flash menggunakan custom recovery atau cwm untuk menginstall framework (pilih sesuai versi device kamu)
xposed-v75-sdk21-arm.zip
xposed-v75-sdk21-arm64.zip
xposed-v75-sdk21-x86.zip
xposed-v75-sdk22-arm.zip
xposed-v75-sdk22-arm64.zip
xposed-v75-sdk22-x86.zip
xposed-v77-sdk23-arm.zip
xposed-v77-sdk23-arm64.zip
xposed-v77-sdk23-x86.zip
Available link for download
Friday, December 16, 2016
Circular App Launcher Gnome Pie 0 6 7 Gets New Clipboard Slice Group Other Changes
Circular App Launcher Gnome Pie 0 6 7 Gets New Clipboard Slice Group Other Changes
Gnome Pie 0.6.7 was released recently with a new experimental feature: clipboard slice group, along with other changes.

Update: version 0.6.8 was released which adds two new themes (Simple Clock and Space clock along with other minor changes).
Gnome Pie is an application launcher inspired by a World of Warcraft addon called OPie. The app consists of multiple "pies", each being triggered by a keyboard shortcut or mouse button you set. Each pie has its own role: applications, bookmarks, main menu, multimedia (play/pause/previous/next), a pie that allows you to control the focused window (maximize, close, etc.) and so on.
Gnome Pie is an application launcher inspired by a World of Warcraft addon called OPie. The app consists of multiple "pies", each being triggered by a keyboard shortcut or mouse button you set. Each pie has its own role: applications, bookmarks, main menu, multimedia (play/pause/previous/next), a pie that allows you to control the focused window (maximize, close, etc.) and so on.

Pies are customizable so you can create new pies, delete existing ones, etc. You can even access pies from a dock (screenshot above) or the desktop.
The new Clipboard slice group remembers an adjustable amount of your last copied items and allows quickly pasting them:

This feature is currently considered experimental because, according to its author, its hard to use quickly because it contains a variable amount of items and also, because its not exactly easy in some cases to tell the entries apart (this also depends on the Pie theme youre using because the copied text is displayed in the center but some themes dont offer this).
Besides this, I would also add the lack of a way to clear the clipboard to this list.
If you have an idea on how to improve this, submit a bug on GitHub!
Despite this, the new Gnome Pie clipboard feature is actually quite useful, especially if youre already a Gnome Pie user and you do a lot of copy/pasting.
To enable the new Clipboard slice feature, from the Gnome Pie settings, select a pie on the left, then on the right click "+" to add a new slice and add select "Group: Clipbord" from the slice type list:

Other changes in Gnome Pie 0.6.7:
- Its now possible to delete imported themes;
- Slices can now be activated with the key pad’s return key;
- Its now possible to load themes which are stored in a directory in an archive;
- The window list groups have been merged into one group. This new group has an option whether to show windows of the current workspace only;
- Updated default configuration of Gnome-Pie with a Window List group;
- Updated default configuration to hide Slice labels.
Also, since our last article about Gnome Pie (0.6.1), the app has received quite a few improvements, including theme import/export, a new Numix theme and the ability to select slices by typing their names, among others.
Furthermore, a while back, the apps preferences dialog was updated to use Header Bars by default (which unfortunately means it doesnt look very pretty under Unity), but you can change this by launching the app with the "--no-header-bar" argument (for instance, you can add this to the gnome-pie.desktop file).
Install Gnome Pie in Ubuntu or Linux Mint
To install the latest Gnome Pie in Ubuntu 15.10, 15.04 or 14.04 / Linux Mint 17.x and derivatives, you can use its official PPA. Add the PPA and install Gnome Pie using the following commands:
sudo add-apt-repository ppa:simonschneegans/testing
sudo apt-get update
sudo apt-get install gnome-pie
If youre not using Ubuntu / Linux Mint, you can download the Gnome Pie source via GitHub.
Once installed, launch Gnome Pie from the menu / Dash and then use CTRL + ALT + A to launch some applications, CTRL + Alt + B for bookmarks, etc. You can find all these keyboard shortcuts, change them or create new "pies" in the Gnome Pie Preferences (which you can access via its AppIndicator / Notification Area icon). For more info on using Gnome Pie, see THIS page.

Available link for download
Friday, December 2, 2016
Clash of Clans 6 322 9
Clash of Clans 6 322 9

Clash of Clans | 49.42 MB |Clash of Clans is an epic combat strategy game. Build your village, train your troops and battle with millions of other players online! Forge a powerful Clan with other players and crush enemy clans in clan wars.
PLEASE NOTE! Clash of Clans is completely free to play, however some game items can also be purchased for real money. If you do not want to use this feature, please set up password protection for purchases in the settings of your Google Play Store app. Also, under our Terms of Service and Privacy Policy, you must be at least 13 years of age to play or download Clash of Clans.
Over 5 Million ????? Reviews
5/5 “This game is phenomenal”
5/5 “If you were looking for a game to play thats fun and strategic this is better than any other game out there”
Clash of Clans is an addictive mixture of strategic planning and competitive fast-paced combat. Raise an army of Barbarians, Wizards, Dragons and other mighty fighters. Join a Clan of players and rise through the ranks, or create your own Clan to contest ownership of the Realm. Driving back the goblins is just the first step - your quest isnt over until your clan reigns supreme over all others!
FEATURES
? FREE TO PLAY
? Build your village into a unbeatable fortress
? Battle with players worldwide and take their Trophies
? Join together with other players to form the ultimate Clan
? Fight against rival Clans in the epic Clan Wars
? 18 unique units with multiple levels of upgrades
? Discover your favorite attacking army from countless combinations of troops, spells, Heroes and Clan reinforcements
? Defend your village with Cannons, Towers, Mortars, Bombs, Traps and Walls
? Fight against the Goblin King in an epic campaign through the realm
Having any problems? Any suggestions? We would love to hear from you! You can find help at http://supr.cl/ClashSupport or reach us at http://supr.cl/ClashForum.
Note: Clash of Clans is an online game and requires a network connection to play.


View on :
Play Store
Download via :
ZippyshareSendSpace
Support us by donate via Paypal. Your donations will be very helpful. Please consider making a donation of $10 , $20 or whatever you can to protect and sustain Samsung Clone. Thanks from Sam Clone Donate $10 Donate $20 |
Comment Below | Post Your Phone | Report Dead Links
Available link for download
Wednesday, November 2, 2016
Cinnamon 2 6 Officially Released Video Screenshots
Cinnamon 2 6 Officially Released Video Screenshots
Cinnamon 2.6 was released yesterday, bringing important changes like improved multi-monitor (with multi-panel) support, redesigned and reorganized system settings, a plugin manager for Nemo as well as various other changes which should bring improved responsiveness, load times and CPU usage.

Cinnamon 2.6 video
Below you can watch a video which features the most important changes in Cinnamon 2.6:
(direct video link; for more videos, subscribe to our YouTube channel)
Unfortunately the new panel multi-monitor support covered that well in the video because theres no screencast app (for Linux) that I know of which can record the active monitor instead of a predefined monitor (and I didnt have time for complicated editing). Sorry about that!
Changes in Cinnamon 2.6 desktop
For the 2.6 release, Cinnamon Panel has received some important changes, with many of them being implemented in order to bring better multi-monitor support.
For instance, the panels can now be added, removed and configured individually (there are no predefined panel layouts any more) and you can place them on any monitor. You can even copy a panels settings or move a panel to a different location:

Yet another panel feature added in Cinnamon 2.6 is a new hide mode, called "Intelligent hide" (intellihide):

Furthermore, the applets should handle multiple instances better and they should be smarter when used with multi-monitor and/or multi-panel setups. For instance, the window list applet only displays windows from the current monitor. Also, the window list actions now allow moving windows to other monitors (this can also be done via a keyboard shortcut: Super + Shift + arrow keys):

Other Cinnamon 2.6 panel/applets changes include:
- the Sound Applet was updated with better PulseAudio support, it detects output devices more accurately and features a slightly revamped UI and a new application mixer (which allows changing the sound level for each app individually);
- a new “inhibit” applet was introduced which allows disabling power management or turning off notifications;
- the User and Network applets were improved slightly revamped UI and a new application mixer (which allows changing the sound level for individual apps).
- The Power Applet was redesigned, it detects batteries better, handles screen brightness and keyboard backlight and it can display secondary devices
Here are a couple of screenshots with the Sound Applet and the new Inhibit Applet:


Another change in the latest Cinnamon 2.6 is the addition of XScreenSaver modules and HTML5 screensavers support to the Cinnamon Screensaver:

Note that by default, only one HTML5 screensaver is installed but you can get many other screensaver by installing the following packages: xscreensaver-data, xscreensaver-data-extra, xscreensaver-gl and xscreensaver-gl-extra.
The System Settings have also received quite a few changes in this release, including a redesign and reorganization of the modules as well as:
- the Effects settings were simplified and some new effects were introduced;
- Power Management, Brightness and Batteries modules were revamped and merged;
- The Startup Applications configuration tool was rewritten as a native Cinnamon settings module;
- various other minor but useful new features were added, such as: you can now set the first day of the week, the size and presence of the multimedia keys OSD, etc.;
- various default settings were tweaked: windows now open in the center of the screen by default, on supported hardware touchpads use two-finger scrolling by default and more.
Here are a few Cinnamon Settings screenshots:


Nemo, the default Cinnamon file manager, has received quite a few improvements in its 2.6 release, including a new plugin manager which allows easily enabling and disabling Nemo actions, extensions and scripts, simplified context menus (theres an option to show all available actions) as well as a queue system for file operations (operations are performed in sequence rather than in parallel, but you can manually start queued jobs):


By the way, for those who want Nemo on other desktop environments such as Unity, you can already install the latest Nemo 2.6 via the WebUpd8 Nemo PPA.
Other changes
Cinnamon 2.6 has also received quite a few under the hood improvements:
- on supported hardware Cinnamon now uses a newer "cogl" API which should prevent some desktop freezes present in previous Cinnamon releases;
- you can now set which Cinnamon components should use loging/consolekit-upower via gsettings;
- Cinnamon 2.6 introduces a preload mechanism which loads themes and app info asynchronously earlier on during the boot sequence, which should improve loading times;
- improved desktop responsiveness, load times and cpu usage by optimizing various Cinnamon components, such as the menu, window management and more;
- information was added to Looking glass logs to report the Cinnamon startup time as well as to indicate how long each enabled applet took to start;
- you can now restart Cinnamon (cinnamon-settings-daemon and Nemo) using a keyboard shortcut: Ctrl + Alt + Esc. Unlike Ctrl + Alt + backspace, which restarts the whole session, this only restarts Cinnamon so you wont lose your work and any open windows;
- extensions are now able to provide different versions of themselves for different versions of Cinnamon.
Getting Cinnamon 2.6
Cinnamon 2.6 will be available by default in Linux Mint 17.2 Rafaela (which should be released at the end of June) and in LMDE 2 Betsy.
For Linux Mint 17.1, is already available in the Romeo repository.
For Ubuntu, the two Cinnamon unofficial stable PPAs I mentioned a while back werent updated with the latest Cinnamon 2.6 yet, but as soon as theyll be updated, Ill publish a new article. Ubuntu users have another option for installing the latest Cinnamon: the official Cinnamon Nightly Builds PPA, but the packages provided by this PPA are unstable and things can break so I do not recommend it (the PPA should only be used for testing purposes).
Cinnamon @ GitHub.
via segfault
Available link for download
Subscribe to:
Posts (Atom)